No. 56 – Safety Items for Steam
Do you want this article in PDF format? Download it here:
Download a PDFCONTENTS
- Water hammer: something that never should occur in a steam system 5
- Steam and condensate water hammer. 5
- Where does water hammer occur? 5
- Results of water hammer. 6
- Conditions causing water hammer. 7
- Hydraulic Shock. 7
- Thermal Shock. 8
- Flow Shock. 9
- Differential Shock. 10
- Other methods of preventing or resolving water hammer.. 11
- Importance of a steam warm-up valve.. 13
- What is a warm-up valve?. 13
- What size steam line requires a warm-up valve?. 14
- Requirements for warm-up valves. 14
- Applications for warm-up valves. 15
- Steam Isolation Valves. 15
- Single-Stage PRV Stations. 16
- Two-Stage PRV Stations. 16
- Proper sizing and installation for steam system safety valves. 17
- Introduction to safety valves. 17
- Sizing guidelines for safety valves. 18
- Installation guidelines for safety valves. 19
- Safety valve discharge vent piping. 22
- Best practice road map.. 22
- Steam piping codes. 25
- Power Piping Code. 26
- Steam Piping Design/Selection. 26
- Condensate Removal From Steam Distribution Lines. 29
WATER HAMMER: SOMETHING THAT NEVER SHOULD OCCUR IN A STEAM SYSTEM
1. STEAM AND CONDENSATE WATER HAMMER
Water hammer is never normal in a steam and condensate system, and it is totally unacceptable in today’s plant operations. Not only is water hammer a system issue, but it is also a safety issue. Understanding the nature and severity of water hammer in a steam and condensate system will allow plants to avoid safety risks and destructive forces.
A better understanding of steam system water hammer will help the plant implement the necessary changes in steam system design, startup, maintenance, operation, and installation to eliminate water hammer. Additionally, this will help provide maximum safety for plant personnel, reduce maintenance costs, and reduce system downtime.
In its most severe form, water hammer can injure or even cause fatalities to plant personnel.
Figure 1. Water Hammer
Unfortunately, 82% of the steam systems in North America experience some type of water hammer. Many mistakenly believe that water hammer is unavoidable and a natural part of steam and condensate systems, but this statement is entirely false. If the system is properly designed and correctly operated, water hammer in any form will not occur. It is possible to have high-pressure steam systems operating without water hammer and enjoy a long operational life from the steam components.
In Figure 1, the red circles show an improper connection to the condensate header, which will generate a thermal shock type of water hammer. Instead of connecting into the side of the condensate header, the returns should enter from the top of the manifold (condensate header).
2. WHERE DOES WATER HAMMER OCCUR?
Water hammer can occur in any steam or condensate line. The steam system faces the greatest risk of water hammer during startup, when the highest level of condensate is generated as the steam line warms up. If the steam line is energized too quickly without proper warm-up time, and if the condensate created during the startup is not being properly removed, water hammer will result.
The other risk of water hammer arises in a steam system when the condensate is not properly removed from steam lines during operation.
Its effects can be even more pronounced in heterogeneous or condensate biphase (flash steam and liquid condensate) systems. Condensate biphase systems contain two states: the liquid (condensate) and a vapor (flash or generated steam). The biphase condition exists in a steam system where condensate coexists with generated flash steam.
Typical examples include heat exchangers, tracer lines, steam mains, condensate return lines, and sometimes pump discharge lines.
3. RESULTS OF WATER HAMMER
The effects of water hammer cannot be underestimated, as its forces have been documented to be capable of the following results:
- rupturing pipe fittings,
- causing valve failures,
- causing heat exchanger equipment failures,
- breaking pipe welds and even rupturing piping systems,
- causing the failure of pipe supports and guides,
- bending internal system mechanisms,
- leading to flange failures,
- overstressing pressure gauges, and
- cracking steam trap bodies.
When water hammer is severe, it can result not only in damage to equipment but also in significant injury to plant personnel.
Water hammer may be occurring and yet be silent to personnel. This means water hammer is not always accompanied by audible noise that the human ear can hear. For example, a steam bubble from flash steam that is delivered into a condensate line under the condensate level in the piping system may be small, yet the collapsing bubble creates a thermal shock that is beyond the range of human hearing. However, the damage to the steam and condensate system is still occurring.
The continuing banging or audible sound accompanying water hammer should be interpreted as the way the steam system is trying to communicate with plant personnel. This audible noise should be an alarm meaning “please correct the system errors to eliminate the water hammer problem, or damage will occur.” This water hammer sound means something in the system is wrong and needs to be corrected.
Evidence gathered while conducting root cause analysis on steam component failure suggests that water hammer causes 67% of premature component failures.
4. CONDITIONS CAUSING WATER HAMMER
Four typical conditions have been identified as causes of the violent reactions known as water hammer:
- hydraulic shock,
- thermal shock,
- flow shock, and
- differential shock.
Each cause is described below.
4.1. Hydraulic Shock
A small percentage of the water hammer problems found in a steam system are caused by hydraulic shock. Hydraulic shock can be easily described by using the example of a home faucet. When the faucet in a home opens, a solid shaft of water moves through the pipes from the point where it enters the house to the outlet of the faucet. This could be 200 pounds of water moving at 10 feet per second, or about seven miles per hour. When the faucet is suddenly shut off, it could be compared to a 200-pound hammer coming to a stop. A noticeable “bang” is heard in the system when the faucet is closed. This shockwave sound is similar to a hammer hitting a piece of steel. The shock pressure wave of about 300 psi is reflected back and forth from end to end until the energy in the piping system dissipates.
This same action can take place in the discharge piping of a condensate pump system when pumps (electric or steam motive) are used in an on/off operation with large condensate pumping capabilities. The pumping system normally has check valves installed on the pump outlet. As the pump starts and stops, hydraulic shock can occur as the condensate flow rapidly stops, and the check valves restrict the flow in one direction.
Solutions:
- For condensate capacities above 12,000 lbs. per hour, use a continuous flow pumping system that incorporates a variable speed drive motor or a level control valve in the discharge line of the condensate pump (pump operates continuously).
- Use disk-type check valves on the pump discharge instead of the common swing type check valve.
4.2. Unit Heater
Unit Heater
Thermal Shock
Figure 2. Incorrect Condensate Piping
One pound of steam at 0 psig occupies 1,600 times the volume of a pound of water at atmospheric conditions. This ratio drops proportionately as the condensate line pressure increases. When the steam collapses, water accelerates into the resulting vacuum from all directions with great speed.
In biphase condensate systems, steam bubbles may be introduced below the level of condensate in a condensate line. For example, a branch line from a steam trap station may be piped to the bottom of a condensate main header, as shown in Figure 2.
Figure 3. Connecting Into the Condensate Header
Example: Steam is introduced into the heat exchanger (P2) at 100 psig or 338°F, and condensate at P3 will be 338°F. When the condensate passes through the steam trap station at P4, a percentage of the liquid will flash to steam due to the low pressure/temperature relationship. When the flash steam bubble flows to P5 and is introduced below the condensate level in the condensate piping, the thermal differences will cause the flash steam bubble to collapse. During the collapsing, the water is accelerated to an extremely high speed due to the vacuum that occurred when the bubble collapsed. The result is a pinging sound or, when there is large quantity of flash steam (bubble is large), a very sharp banging sound.
Figure 4. Proper Piping: Condensate Branch Line Into the Top of the Main Condensate Header
- Connect into the condensate header. All condensate system branch lines must be connected into the top of the main condensate header: there are no exceptions. The condensate connection is at the top of the horizontal condensate main header. Never connect branch lines into a vertical condensate header.
4.3. Flow Shock
Figure 5. Steam Line Safety Valve
Flow shock is most commonly caused by a lack of proper drainage ahead of a steam line isolation valve or steam control valve. For example, consider a steam line isolation valve (typically used with pipe of 3” or larger) opened without the use of a warm-up valve. When the large valve is opened, steam rushes down a cold pipe, producing a large quantity of condensate at high velocity. This condensate will continue to build in mass as it travels along the pipe, and a large wave of condensate is created. The wave will travel at a high velocity until there is a sudden change in direction, possibly an elbow or valve in the line. When the condensate changes direction, the sudden stop will generate water hammer.
When a steam control valve opens, a slug of condensate enters the equipment at a high velocity. Water hammer is produced when the condensate impinges on the heat exchanger tubes or walls.
Solutions:
- Install and use a warm-up valve, as shown in Figure 5 Error. Reference source not found.
- Install a steam line drip leg pocket with a steam trap station ahead of the isolation valve.
These recommendations will prevent water hammer during startup and promote long valve life.
4.4. Unit Heater Differential Shock
Figure 6. Differential Shock: Condensate Wave in the Condensate Header
Differential shock, like flow shock, occurs in biphase systems or the condensate system. It occurs whenever steam and condensate flow in the condensate line at different velocities. In biphase systems, the velocity of the steam is often 10 times the velocity of the liquid. If condensate waves rise and fill a pipe, a seal is formed temporarily between the upstream and downstream side of the condensate wave. Since the steam cannot flow through the condensate seal, pressure drops on the downstream side. The pressure differential now drives the condensate seal at a high velocity downstream, accelerating it like a piston. As it is driven downstream, it picks up more liquid, which adds to the existing mass of the slug, and the velocity increases.
Just as in the example above, the slug of condensate gains high momentum and will be forced to change direction due to an elbow or a valve in the line. The result is usually great damage when the condensate slug pounds into the wall of a valve or fitting while changing direction.
Since having a biphase mixture is possible in most condensate return lines, correctly sizing condensate return lines becomes essential. Condensate normally flows at the bottom of a return line with the assistance of gravity. Condensate flows naturally because of the pitch in the pipe and because the higher-velocity flash steam above it pulls it along. The flash steam moves at a higher velocity because it moves by differential pressure.
Flash steam occurs in the condensate return lines when condensate discharges into these lines that are operating at a lower pressure. The lower pressure causes a percentage of the condensate to flash back to steam at the given saturation pressure. If the lines are also undersized, additional pressure is created in the line. This pressure pushes the flash steam at relatively higher velocities toward the condensate receiver, where it is vented to the atmosphere.
The flash steam loses heat while moving in the line, causing some of the flash steam to condense and contributing to the pressure differential and amplifying the velocity. Because the flash steam moves faster than the condensate, it makes waves. As long as these waves are not high enough to touch the top of the pipe and do not close off the flash steam’s passageway, there is no problem. This is why larger condensate return lines are preferred. To control differential shock, the condensate seal must be prevented from forming in a biphase system.
Condensate line velocities (two-phase flow) should never exceed 4,500 fpm. If the condensate line is properly sized for the liquid and flash steam, but the plant does not have a proper steam trap management program and steam traps have failed and are blowing steam into the condensate line, this will contribute to increasing velocities above 4,500 fpm, and water hammer will occur in the system.
Solutions:
- Use condensate lines sized for 4,500 fpm or less.
- Institute a steam trap station management program to eliminate unnecessary steam from being introduced into the condensate line.
5.OTHER METHODS OF PREVENTING OR RESOLVING WATER HAMMER
Unit Heater
A variety of design or system changes can be implemented to prevent or eliminate water hammer:
- Implement proper training for plant personnel.
- Ensure the correct steam and condensate design.
- Have documented standard operating procedures (SOPs) for steam system startups and shutdowns.
- Have installation standards for steam components.
- Specify and place steam line drip steam traps on the steam system properly.
- Correct condensate connections of branch lines to the main condensate line and enter only from the top.
- Use steam traps that are properly sized and appropriate for the application.
- Figure 7. Standard Drip Leg Installation: Best Practices
Use warm-up valves on steam line isolation valves larger than 2 inches. Do not crack open large steam isolation valves with the hope of avoiding condensation-induced water hammer. This will not guarantee safe operation. - Check or repair the pipe insulation. It saves energy and reduces the accumulation of condensate in the piping system.
- Condensate line sizing is crucial to ensure proper operation of the steam system. Undersizing the condensate lines is one of the largest contributors to water hammer.
- All steam valves that can be in the closed position must have proper drip legs on the steam line to remove any condensate buildup in the closed position.
- Always direct condensate gravity drainage away from the process applications with a modulating control valve.
- Condensate can be drained into a pressurized condensate return line only if the proper differential is maintained.
- Label the steam and condensate lines properly.
- Remove abandoned steam and condensate lines from the system.
STEAM WARM-UP VALVES
1. IMPORTANCE OF A STEAM WARM-UP VALVE
A steam warm-up valve is an essential part of the steam system because it helps ensure a safe and reliable operation. The starting up or warming up of a steam system is when the highest condensation and all the thermal expansion of the steam line occurs. Therefore, to optimize safety and reliability, the steam line must be warmed up in a predetermined time frame, with a slow ramp up to the desired temperature and pressure.
2. WHAT IS A WARM-UP VALVE?
Figure 8. Isolation Valve Without a Warmup Valve: A Cheater Bar on the Handle to Assist in Opening the Valve—Safety Issue
A warm-up valve is a small valve installed in a piped or tubing bypass loop configuration around a large isolation valve or installed in a pressure-reducing valve (PRV) station. Some other special applications require a warm-up valve, but they will not be covered in this technical paper.
At startup, the warm-up (smaller) valve is opened before the larger valves (isolation or PRV valves) are opened to allow the system to warm up gradually and to equalize pressure on both sides of the isolation valves. The equalized pressure enables an easy opening of the larger valves, reduces thermal shock, and eliminates other problems associated with trying to open larger valves with high-pressure differentials, such as water hammer, wire drawing, or erosion.
Steam systems typically use a gate valve for isolation, and the design of a gate valve requires equal or close to equal pressure on both sides of the internal gate for the valve to open without external force. If the pressure is not equalized, then an external force, such as a pipe wrench or a cheater bar (the nickname for devices that open gate valves), must be used to open the valve handle. See Figure 8. Using this type of force on a gate valve is an unsafe practice that can lead to injury or death.
Figure 9. Gate Valve for Isolation
P1- INLET – HIGH PRESSURE ON THE CLOSE GATE
As shown in Figure 9, a gate valve will have a force on the P1 (inlet) side that will put extreme force on the gate, thrusting it into the valve seating surface. Using a warm-up valve, the P2 (outlet) pressure will counter the P1 force, and the gate will be allowed to rise without using external forces.
If the plant operation is using a butterfly or ball valve, which are quarter-turn valves, for steam isolation applications, then warm-up valves are essential to bring the system up to pressure. It is impossible to warm up a steam system slowly with the use of a butterfly valve or ball valve that is 3” or larger.
3. WHAT SIZE STEAM LINE REQUIRES A WARM-UP VALVE?
When installing an isolation, shutoff, or bypass valve on the steam distribution system (3” or larger), it is necessary to install a small valve (½”, ¾”, or 1”) around the isolation valve. What size the warm-up valve should be depends on the length and diameter of the steam line that needs to be warmed up.
4. REQUIREMENTS FOR WARM-UP VALVES
All warm-up valves should be selected for the following characteristics:
- The needle valve design is preferred for throttling steam.
Figure 10. Isolation Valve Purchased With a Warm-Up Valve and Loop
- The globe valve is the second choice for internal valve design.
- The internal permissible leak rate standard should be higher than a Class IV shutoff.
- American National Standards Institute (ANSI) or FCI standards
- API standards
- The outlet piping or tubing needs to be increased by one pipe diameter.
- Example: With ¾” inlet piping and a ¾” warm-up valve, the outlet piping/tubing should be 1” or larger. This will reduce the velocities out of the valve and improve the valve’s reliability.
- Two valves should be installed on the warm-up line:
- one valve for the warm-up operation, and
- a second valve for isolation.
- Use a double-block valve with a bleed valve.
- More than one warm-up valve can be installed.
- This setup is ideal for larger steam systems.
5. APPLICATIONS FOR WARM-UP VALVES
5.1. Steam Isolation Valves
One of the most common applications is the steam line isolation valve installation.
Figure 11. Diagram of Warm-Up Valve Installation
5.2. Single-Stage PRV Stations
The single-stage pressure-reducing valve (PRV) is another application for warm-up valves.
Figure 12. Single-Stage PRV
5.3. Two-Stage PRV Stations
The two-stage PRV is an additional application for warm-up valves.
Figure 13. Two-Stage PRV
PROPER SIZING AND INSTALLATION FOR STEAM SYSTEM SAFETY VALVES
1. Introduction to Safety Valves
One of the most critical safety devices in a steam system is the safety valve. Safety valves protect personnel, equipment, and property from potentially dangerous high temperatures and forces caused by excessive steam pressure in the steam system.
Figure 14. Safety Valve
Steam safety valves are required by codes, insurance, and corporate mandates. Therefore, it is important to have the safety valve properly sized and installed to meet all code requirements. A well-documented database and up-to-date records of all safety valves in the steam system are standard best practices for plant operations today.
The steam safety valve database contains all relevant information about all safety devices that the plant can use for yearly inspection of the Section I and Section VIII (code) safety valves. The safety valve database should always be updated with the yearly information from inspections and changes based on plant standards; insurance company recommendations; and federal, state, or local government requirements.
The code that establishes the requirements for steam safety valves is written by the American Society of Mechanical Engineers (ASME). The ASME, through its committees, has published and continues to update the Boiler and Pressure Vessel codes for safety valves. It is the responsibility of plant personnel—primarily the plant’s steam team—to know which codes apply to the different parts of the steam system.
2. SIZING GUIDELINES FOR SAFETY VALVES
- The set point for the safety valve shall be at least 10% between the operating system pressure and the safety valve set pressure. This will prevent the safety valve from operating in the simmer mode, which the code does not allow.
Figure 15. Steam Safety Valve on a Steam Line
- When considering a safety valve downstream of a steam pressure control valve, the total capacity of the safety valve at the set point must exceed the steam control valve’s maximum flow capacity (the largest orifice available from that manufacturer) if the steam valve were to fail in the fully open position.
- The plant should size the safety capacity according to the control valve’s maximum flow by calculating the inlet steam pressure (PI) at the maximum steam pressure, which is the safety valve setting of the steam supply source. The plant should not calculate the maximum steam pressure using the steam system’s nominal operating pressure.
Figure 16. Two Stage Pressure Reduction with Safety Valve
- Many times, it is not possible to install a single safety valve because of high steam capacity or physical limitations. An acceptable alternative is to employ multiple safety valves on the same steam system. The safety valves can be of different set points so long as the set points are below the steam system maximum design pressure. The total steam capacities must be equal to or greater than the maximum steam flow to the system to ensure they never exceed the maximum steam pressure.
- When a safety valve is installed downstream of a control valve or a regulating valve and a bypass valve are installed, the bypass valve must always have a smaller diameter than the control valve to ensure it has a lower flow coefficient (Cv) than the control valve. If the bypass is the same size as the control valve, then the safety valve has to be sized for the valve (control valve or bypass) with the higher Cv.
- The plant should set the set pressure of the safety valve at or below the maximum allowable working pressure (MAWP) of the component with the lowest MAWP in the steam system. This includes, but is not limited to, steam boilers, pressure vessels, equipment, and piping systems. In other words, if two components on the same system are rated at different pressures, the safety device protecting the steam system for both devices must be set at the lower of the two MAWPs.
3. INSTALLATION GUIDELINES FOR SAFETY VALVES
Figure 17. Typical Safety Valve Installation
- The steam system must be clean and free of any dirt or sediment before commissioning the steam system with a safety valve. This can be accomplished by preparing the steam piping before the steam piping has been installed or by conducting controlled steam blows after the installation.
- The safety valve shall be connected to the steam line independent of any other type of connection. Also, the safety valve should be located as close as possible to the steam line or vessel.
- Safety valve flanges will be installed according to the appropriate bolt torque specifications, procedures, and torque patterns.
- The safety valve must be installed at least 10 pipe diameters downstream of any valve, elbow, or other device that could disrupt the steam flow.
Figure 18. Safety Valve Installation After Pressure-Reducing Valve
- The safety valve must be mounted vertically, with the valve’s spindle in an upright vertical position. The safety valve shall not be more than 1 degree off vertical.
- The steam line or pressure vessel shall be free of any vibration or water hammer that could change the set pressure of the safety valve.
- The inlet steam piping to the safety valve must be equal to or larger than the safety valve inlet connection. For a safety valve with a 3” inlet connection, the piping from the vessel or header shall be 3” or larger.
- There shall be no intervening shutoff valves between the safety valve inlet and the steam component that could permit the safety valve to be isolated from the system or that would restrict the steam flow to the safety valve.
- Drains or vent openings on the body of the safety valve shall not be plugged or capped. The purpose of the drain or vent openings is to allow any liquid that might accumulate above the discharge valve to drain. The drain or vent connection shall be piped to a drain for proper evacuation.
- Safety valves are set, sealed, and certified by the manufacturers or an authorized and certified assembler to prevent tampering by unauthorized personnel. If the wire seal on the safety valve is not intact, the valve is no longer in compliance with the code and should be replaced as soon as possible.
Figure 19. Safety Valve Installation on Heat Transfer
- For multiple safety valve installations using a single connection, the internal cross-sectional area of the inlet shall be equal to the combined inlet areas of all the safety valves.
- When using more than one safety valve, the discharge vent piping must be sized to accommodate the full flow of all safety valves in a fully open position simultaneously when there is no backpressure on the safety valve outlets.
- Never attach the safety valve discharge vent piping directly to the safety valve, which would place undue stress and weight on the safety valve body and change the set pressure of the safety valve. A very short section of vent pipe must be used to connect the safety valve drip pan elbow to the safety valve if the drip pan elbow is not directly connected to the safety valve.
- All safety valves should use a purchased or custom-made drip pan elbow on the safety valve outlet for the following reasons:
- The drip pan elbow isolates the safety valve from the weight of the safety valve vent piping.
- The drip pan elbow changes the steam flow at the outlet of the safety valve from horizontal to vertical.
- The safety valve discharge vent pipe may not touch the drip pan elbow. The discharge vent piping should be supported independently from the safety valve/drip pan elbow assembly to prevent undue stresses on the safety valve.
- The drains on the drip pan elbows are designed to collect any condensed liquid and rain and allow flow safely away from the safety valve. Do not plug the drip pan elbow openings.
- Steam will not escape from the drip pan elbow configuration if the safety valve discharge vent line is properly sized.
3.1. Safety Valve Discharge Vent Piping
- The diameter of the discharge vent pipe must be equal to or greater than the safety valve outlet.
- The discharge vent line will be sized so that no backpressure is created on the safety valve discharge during the discharge mode.
- Minimize the length of the discharge vent pipe. A rule of thumb is that if the discharge vent pipe exceeds 30 feet and has more than one elbow, then the discharge vent piping must be increased in size to prevent backpressure on the safety valve.
- The discharge outlet of the vent pipe should be piped to the closest location where free discharge of the safety device will not pose any safety hazard to personnel. The typical safety valve discharge point is above the roofline or above the plant’s operating unit. The safety valve discharge vent should be no less than 7 feet above the roofline or the operating unit. The top of the discharge vent line should be cut at a 45-degree angle to dissipate the steam discharge thrust, to prevent capping of the pipe, and to visually signify to plant personnel that it is a safety valve vent line.
The proper selection, installation, and use of safety valves require a complete understanding of the ASME code and any additional requirements adopted by insurance companies or the local jurisdictional authority.
Figure 20. Discharge Vent Line Attached to the Safety Valve: Installation Is Incorrect
Figure 20 is an incorrect installation with the discharge vent line is firmly attached to the safety valve outlet, which will put stress on the safety valve.
4. BEST PRACTICE ROAD MAP
- Establish plant standards for safety valve installation and selections according to steam best practices.
- Add all safety valves to a database.
- Review all safety valves periodically, depending on plant standards; insurance company recommendations; and federal, state, or local government requirements.
STEAM PIPING CODES
All plant personnel who are involved with the steam system, from the maintenance person to the highest level of engineering personnel, need to understand at least part of, if not all of, the essential codes for steam and condensate. A maintenance person acquiring a flange from the storeroom must understand that the flange needs to be rated for the maximum pressure and temperature of the system where the flange will be installed. Failures in the system are often due to the selection of components based on operating steam pressure and temperature and not on the maximum pressure and temperature.
Figure 21. Isolation Valves and Control Valve
The engineering personnel need to know that if the steam pressure is increased in the system, all components (flanges, piping, valves, expansion devices, etc.) must be rated for the new higher steam pressure and associated temperature.
Example: Figure 21 shows two isolation valves and a control valve. The isolation valves are rated to 2,000 psig, but that is cold working pressure (CWP) or ambient temperature (70°F). This 2,000 psig rating will not meet the code unless the vendor supplies all the information. The vendor(s) of these valves supplied the maximum pressure rating for the maximum temperature in the steam system. Thus, the isolation valves and control valve met the code requirements. Each valve for steam systems requires documentation of the maximum pressure rating and the maximum temperature of the steam.
The operating steam pressure cannot be used for the pressure and temperature rating of the steam valves. The steam system must be reviewed for the set pressure of the safety valve protecting the steam system. Therefore, the steam valve rating is based on the set pressure of the safety valve, not the operating pressure.
The American Society of Mechanical Engineers (ASME) codes and standards evolved from the response to historical events or failures and the desire to provide a safe and reliable manufacturing environment. The code for pressure piping is defined and maintained by the ASME and is collectively identified as B31.
All codes can be purchased from ASME.
The ASME B31 code consists of a number of individually published sections:
- 1 Power Piping
- 3 Process Piping
- 9 Building Services Piping
1.B31.1 Power Piping Code
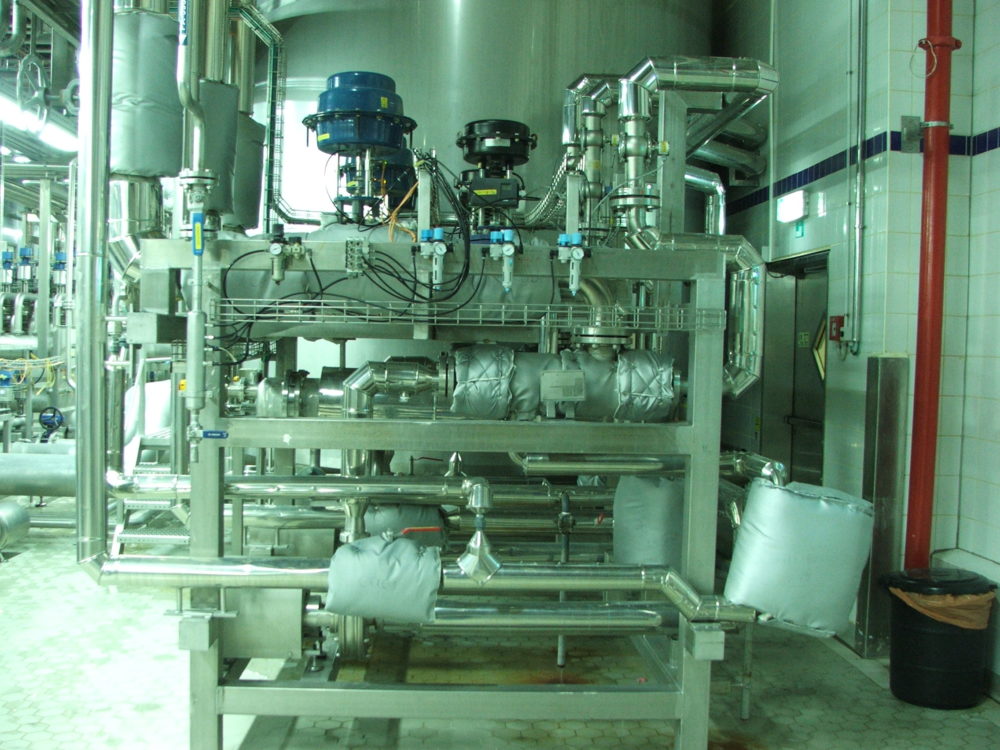
Figure 22. Steam Piping
The B31.1 Power Piping Code covers piping and components found in steam and condensate systems in industrial plant operations.
The B31.1 code prescribes minimum requirements for the materials, design, fabrication, construction, testing, inspection, operation, and maintenance of piping systems. The term “piping systems,” as defined in B31.1, applies to all piping and its component parts for the steam and condensate system.
2. Steam Piping Design/Selection
The B31.1 code states that all components in a steam piping system are subject to design conditions and criteria. These design conditions define the pressures, temperatures, and various forces applicable to the steam and condensate piping system. The function of the design conditions is to provide guidance for materials, fabrication, installation, and testing. Steam piping systems must be designed for the most severe conditions of coincident pressure, temperature, and loading. The most severe condition or the highest steam pressure and temperature will result in the greatest required pipe wall thickness and highest flange rating.
When piping is selected for a particular steam service, numerous factors must be considered. All piping components such as pipe material, pipe sizes and schedules, elbows, tees and branch connections, reducers, and other standard and special fittings are subject to these design considerations.
The design of the steam piping has three components: pressure design, temperature, expansion/contraction, flexibility design, and sustained load design. The pressure design accounts for the steam pressure and temperature, normal operating conditions, and any abnormal operating or environmental conditions (e.g., earthquake, high wind, etc.). A flexibility design performs a fatigue analysis, which considers the thermal expansion during startup-shutdown cycles. The sustained load design determines the pipe hangers and supports to hold the piping secure during normal operation and short-term loads, such as the line filling entirely with condensate or forces caused by earthquakes or high wind.
Figure 23. Piping Connections
Notes applicable to steam piping:
- Valves fall under the same standards and specifications.
- Flanges also are subject to the same standards and specifications.
- Specific requirements also define the methods to join flanges of different materials.
- Bolts, studs, nuts, and washers are required to comply with the applicable standard.
- All welded joints on B31.1 piping are required to follow specific rules for fabrication and examination.
Figure 24. Piping Not to Code
- Threaded connections are also prohibited on 3-inch line greater than 400 psig or 2-inch line greater than 600 psig.
- Pipe with a wall thickness less than that of standard weight cannot be threaded.
- Steam trap discharge piping must be designed to the same pressure as the inlet piping unless the discharge is vented to the atmosphere.
- No valves are permitted between the piping or vessel protected and the safety relief valve.
- No valves are permitted in the safety valve discharge vent line.
- The discharge of safety relief valves must not impinge on other piping or equipment and must be directed away from areas occupied by personnel.
- Sectional areas of the discharge piping cannot be less than the safety relief outlet.
- Discharge lines from safety relief valves must be designed to facilitate drainage.
- The discharge piping cannot restrict the thermal growth of the unit the safety relief valve protects.
- Drainage must be provided to remove water collected above the safety valve seat.
Condensate Removal From Steam Distribution Lines
All steam distribution lines need to have adequate condensate removal from the steam line on a continuous basis. The most critical steam trap station is on the main steam lines to prevent any condensate from accumulating, thus preventing premature steam line failures and severe water hammer. To have steam line steam trap stations shut off or not functioning creates a major safety risk: the plant is risking a major failure that could instantaneously release high-pressure steam to the atmosphere, which puts plant personnel at a high safety risk.
Note: All main steam line condensate removal steam trap stations need to be operating and should have the highest priority in any steam trap station management program.
All steam lines need to have properly operating condensate removal and functioning steam trap stations. No matter how well the steam line is insulated, the heat (latent) energy will be transferred from steam into the atmosphere through the insulation. When latent energy is released or phase change occurs, condensate will form in the steam line. The condensate will form on the interior wall of the steam line and drain by gravity to the bottom area of the steam line. The velocity of the steam in the steam line will make the condensate flow in the direction of the steam flow.
The condensate volume will depend on several conditions, such as the following:
- insulation (its efficiency and condition),
- steam pressure,
- length of pipe, and
- steam quality.
When the condensate is flowing with the steam at the bottom of the steam line, the condensate will flow in a swaying motion, not in a direct path at the bottom of the steam pipe. Therefore, the steam line drip leg pocket must be large enough to allow condensate to be collected. (The drip leg pocket is the name of the branch line extending down.)
Here are the locations to install condensate removal drip pockets on steam lines:
- all low points,
- any change of direction,
- all valves that could be in the off position (control or isolation),
- every 700 feet (estimated distance) of straight steam piping, and
- before steam flow metering.
Review the system to ensure proper placement of all drip leg pockets. The pockets need to be properly sized, be properly installed, and have a proper steam trap station for condensate removal. A manual blowdown line should be provided at the side of the steam line drip pocket for proper condensate and air removal at startup in the plant startup procedures.