Detecting Internal Leakage
Welcome this afternoon. I’m going to be talking about steam valve internal leakage testing or leak testing. Just to go through the [inaudible 00:05:50] and so on, steam valves installed in the plants create a complexing problem, because we don’t want valves to be leaking through. Valves leaking through create issues with pressure reduction stations, over pressurization, safety valve relieving, steam valves leaking through on process applications, then we get heating going down into the coil systems, heat transfer and we don’t want that to occur. It comes down to how do we test valves for internal leakage? By going up and saying, “The valve is hot on one side, hot on the other side,” doesn’t really work. Temperature, because we talk about energy and everything else today, the thing is 100 psi coming into the valve, it’s going to be 338 degrees Fahrenheit. Well, energy’s going to be transferred from the valve downstream, and the valve body downstream is going to be hot, just through conduction.
By coming up there and saying test the valve by temperature, is quite difficult to do, it’s very difficult. We must come up with another way of testing. The thing is, that coming up with high frequency, high frequency has been around for a while, and proved extremely successful. As you can see, anything working above 20 kilohertz in frequency, above the human ear. Anything that’s passing through a restriction will cause turbulence swell, which generates a high frequency ultrasonic sound. The ultrasound units will pick up this high frequency. Now, typically when setting up high frequency units, we want to look at frequencies of 20 kilohertz to roughly around 40 kilohertz, which really gives us the best signature, which is seen passing through a steam valve.
The thing about it is, every test method has advantages and disadvantages. I’ll be talking about advantages, but I’ll also be talking about some of the disadvantages with it. [inaudible 00:08:10] easy an accurate test method, 98%. With high frequency ultrasounds, I’ve been with valves as large as 12 inches in diameter and have been able to tell if it’s leaking in the exact points on the leakage of the valve. It’s a very easy [inaudible 00:08:28]. There are a few things I want to go through when you’re conducting the test. The next thing is that setting up the ultrasonic unit is very versatile, highly accurate, fast and easy. The thing about the high frequency ultrasound units, it gives me a display of the ultrasound that I’m picking up, which is a visual, and it also gives me the ability for the user, the operator to hear that sound, if they can hear sounds.
The high frequency ultrasound is heterodyne into an audible sound, so you can listen to a headset, so you get two. You get a visual, and you also get a hearing of the valve if it’s leaking through. The proper test methods go to eliminating outside influences, so unfortunately in the steam system there’s outside influences, it could be generally high frequency ultrasound, and we must be able to detect it, if we have some other outside influences influencing our reading. We’ll kind of go through that a little bit. The other thing is accurate ultrasound testing, accuracy of test results. The thing is, is that I want to be able to go up to the valve, and be able to tell that yes, it is leaking, or no, it’s not leaking. We want a very accurate test.
Positive, the positive reviews with ultrasound, like I said fast and easy, highly accurate, can detect other defects in the system that’s used for other purposes in the steam system, testing steam traps, things like that. The negatives, training is required. Again, any tool that you use in the steam system requires training. To get a tool and not to have training, you’re set up for failure. You must provide training for the people that are going to be using these units. The thing about it is, is high frequency ultrasound is like riding a bicycle, it really is. The more you ride the bicycle, the more proficient you get. The thing is, is the more experience you get with high frequency, the more ability you’ll have, the more accuracy of your readings, like riding a bicycle.
What generates ultrasound? Steam passing through a valve that’s supposed to be closed. The leak path will generate a turbulent flow. The leakage between the valve and the feeding insertions will generate a turbulent flow, which will generate a high frequency ultrasound, which this unit will pick up, such as cage, valve, globe, gate, butterfly, any type of a valve. The instrument that senses the ultrasound can detect very low ultrasonic levels, to very high ultrasonic levels. You have a sensitivity adjustment to make the unit very sensitive, and to be able to detect a leak level of one time to minus two, or a very large leak. The thing about it is, is understanding what leak level you’re picking up. The sensitivity values can be zero to ten, and the sensitivity values can be zero to 70, depending on the instrument that you’re using.
The other thing is that on these units you can have real-time snapshot and peak hold, which are ability to look at the peaks, or just a snapshot of real time. For testing valves, we always want to be in real time mode. How to get started? I’ve got a valve out there I want to test and see if it’s seeded, or if it’s leaking through, and how to get started. The thing is, is before it gets out is who’s going to be doing the testing? How am I going to select the team? Does the person have experience, or doesn’t have experience, and selecting the correct equipment? Years ago, we used to use screwdrivers a lot. It wasn’t too safe of a thing because you got too close to the valve it could be extremely hot and burn your ear, safety. Today we don’t have to do that. We want to use ultrasonic equipment, and training, what training is required to do the task. Determine the data collection process, what are we talking about? Where do I collect the data, and how do I collect the data?
The thing is that priorities for testing the valves, so if I must go and test 20 bypass valves, and I come back and ten of them are leaking, what degree of leakage? I set priorities. The ones with the highest ultrasonic level, or flow, is the ones I’m going to do first. The ones that are very low ultrasonic levels, then they’re lower priority. Besides the priority, depending on my test results. Set up a correction roadmap. We talked about a selection standard, installation standards, and then once I have made the correction, you go back and validate it with another testing procedure to make sure the valve is in a shut-off position, and not leaking. A lot of times we buy valves that leak brand new, so we use a testing procedure to make sure that we’re getting valves that do not leak through.
Three major areas of valves. The big one is steam isolation valves. Then I go up and shut an isolation valve off, I want the valve to shut off. I do not want the valve to be leaking through, and in steam systems we must have two valve protection. We want to make sure both valves are not leaking through. If they are, then we must shut four valves off, sometimes we must shut six valves off because of internal leakage, so we want to make sure the valves are feeding. Another one that’s big in the steam system is steam warm-up valves. Any valve that’s three inch or larger, you must have a steam warm-up valve to warm up the system slowly. We want to make sure that when we shut the main isolation valve, that the warm-up valve is also in the off position, and not leaking through, so we want to test the warm-up valve.
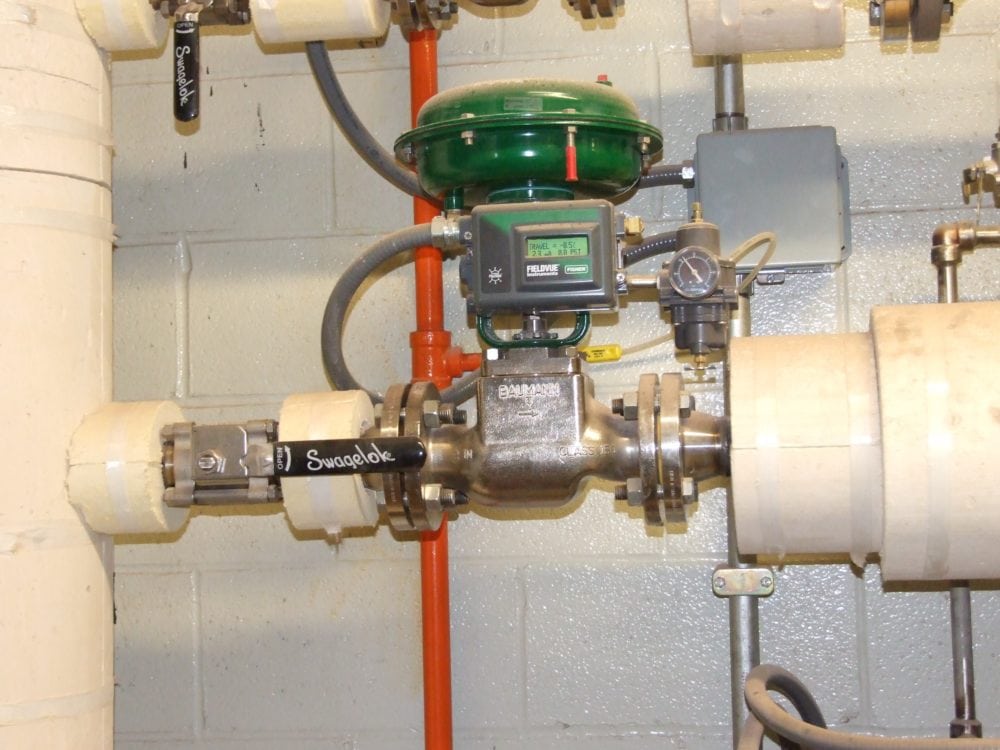
The next one is the steam control valve, the application supplying steam to the heat exchange, or the steam core, we want to make sure that it’s not leaking through. The other thing is when we set up a control loop, we want to make sure, and I’ll be talking about this, where’s the breakaway point of the valve? The breakaway point is when the valve will start to pass steam through it. The thing about it is, is that the testing points on a piping upstream and downstream of the valve. We must take several testing points, that is shown on this print. We have a test point upstream, one and two. At the valve, that’s the discharge side of the valve, that’s the discharge passage of the valve that’s test point three, and test point four and five. Why are we taking the test points? We’re looking to see if we have competitive ultrasound that could be throwing our reading off coming from upstream, or downstream. [inaudible 00:16:24] that competing ultrasound. Now, can you take more than five test points? Sure, you can take ten if you want, but I request that you take at least five test points on every test.
The thing is, is the distance between a test point is upstream and downstream, so how far should I be away from the valve? Well, it depends on the valve size. A general guideline is I want to be on test point that’s at least ten inches from the valve, which is ten inches from the valve to test point two, and then 24 inches from the valve to test point one. Now, that’ll depend on the size of the valve. If I go up to a 36-inch valve, of course I want to be a little bit further away than that, but it’s a general guideline. The same thing for the dimensions downstream, is test point four to be ten inches, and test point five to be 24 inches. Again, I’m looking for the competing ultrasound.
Now, reference numbers using a scale to 100. For this, this paper, this presentation, I use the number zero to 100, 100 being severely leaking, or grave leakage, and zero no [inaudible 00:17:53]. I go to test point one, and I get a reading of 27. At test point two, I get a reading of 26. Test point three, I get a reading of 25, and three and four I get a reading of 24 and 25. All these numbers are close, and ultrasonic levels. The valve is not leaking, the valve is not leaking. A leak will generate more ultrasonic sound then you’ll know the leakage is occurring.
On this here, this isolation valve, with all the points well close and the ultrasonic level gives me the indication the valve is seeded, and it’s not leaking through. If I go to the next measurement, which is here, now at test point one is 27, test point two is 26, and test point three is 45. You see, the increase in ultrasonic levels, and then it dies down 34 and 25. The increase in ultrasonic levels tells me the valve is leaking because there is ultrasound being generated. We determine that this valve is leaking at the discharge side of the valve, because of higher ultrasonic levels.
Then I go to the next reading, and test point 125 is 21, test point three is 38, test point is 40, you see the increase of 57 at test point five. What’s that saying is there is ultrasonic sound being generated downstream or competing ultrasonic sound. As I go downstream, the level starts to increase, the sound is coming back from downstream. That is not a valve that’s leaking, that’s some competing ultrasound downstream, I want to go downstream of the valve and find out what’s competing or producing a competing ultrasonic sound and make corrections to that.
The same thing with the bypass, this is the warm-up valve, sometimes called bypass, or this is really the warm-up valve. Test point one two, and at the discharge is valve three, and downstream is four and five. By doing the test method with this, it’s the same test method we would use for the isolation valve. We would take our measurements. If one, two, three, four, and five are equal at ultrasonic levels, the valve is seeded. If one and two are equal to three has increased in ultrasonic level, and four has decreased, then the bypass valve is leaking, or the warm-up valve is leaking. Ultrasonic sound is very directional, so by taking these points and seeing the increase at the discharge side of the valve tells us it’s leaking, all ultrasonic levels should be close, nothing’s going to be perfect, they’re not going to be 25, 25, 25. Life’s not perfect. As you see the increase is here, there’s ultrasonic sound being generated. That’s a quite common process that we use on warm-up valves all the time, because we want to make sure that they are in the seeded position.
[inaudible 00:21:33] shut-down at the end of the year, we want to make sure we know about all that are leaking and get them corrected. The next thing is two ways to test the control valve, by checking the steam for control valve leakage, and then determine the breakaway point. The same as isolation valve, I’m going to be doing test points one and two, five at the discharge point, three and four. On here they labeled one and two upstream, three and four downstream, and five to the discharge side of the valve. Again, if I did the test one and two, and valve three and four were equal, the steam control valve is seeded and is not leaking. If I do one two, and there’s an increase at five, and then decreases at three and four, then the control valve is leaking. If I do a test one, two, five, three starts to increase, four is higher yet, then the competing ultrasound is downstream, and I need to find out what is competing. Not so much as leaking, we do test for leaking. The other method for the valve, I just went through this for the valve off position.
This here is more what we said [inaudible 00:22:59] ultrasound. When we go to set up a control valve, and it’s very important to understand the breakaway points, so what’s the breakaway point? The breakaway point is the point where the steam control valve starts to pass steam through it. This control valve can accept a four to 20 milliamp signal into the positioner, or a 10 to 15 psi in a positioner, or if it doesn’t have a positioner from an IDP, three to 15 psi. As I start to apply the control signal into this valve, at what point does the valve start to pass steam? If it’s 4.0 milli amps, and I go to 4.4 milli amps, is it passing steam yet, or does it start to pass steam at five, and five and a half? It’s very interesting when setting up a control valve, sitting there with a four to 20 milliamp generator and seeing exactly what points steam starts to pass through the valve, because I’m trying to set up a PNID loop, and the PNID loop assumes 4.0 milliamp is zero, and 4.4 milliamp there is flow.
If I have a dead band down here on the PNID loop that now doesn’t pass steam until 4.8 milliamp, it all starts to cause some issues with the PNID loop setting up and turning it. If you’re just seeing water to your 80-degree seed, and you can take five plus or minus five degrees C fluctuation it’s not a problem. We get in processes where you must have plus or minus .5 degrees C, so this breakaway point inside this control valve becomes very, very important. There are a couple things that we do on the control valves that is setting up this control valve for the breakaway point and understanding the breakaway points and the valves, and that’s setting up the control valve.
The same thing with this technology applies to the steam control valves, can be applied to utilizing hydraulics, and internal hydraulic leakage, and other valve applications outside steam, I’m just talking about steam today. Those are some of the applications that you have using it. The thing is, is no internal steam valve leakage, then we don’t have to worry about premature valve failure, because steam leaking through a valve, steam will wire draw the seep area in the valve mechanism, the plug, or whatever.
The other thing is that we are looking at no component failures within six years of installation, period. The steam system connects is up to date, component failures within six years. Internal leakage can cause issues in operation, so by doing this test, then we can determine what’s causing it, and then the other thing about finding the leakage and everything else, is to determine what caused the leakage to begin with, it must be part of the program. The last is my contact information, and if you have any questions, just let me know. Thank you.
Speaker one: All right, great. We did have a couple questions come through. The first one, they said, “I’m testing at a new facility, and our steam lines are all insulated. What testing is possible to do to find leaks in my situation where I cannot test several places upstream and downstream?”
Kelly Paffel: Well, the thing about it is, is that’s a common problem, but what we do is penetrate the insulation with a small hole, we call test plug, so you make an opening in the insulation, so the probe can go in and contact the lines. Once the test is done, then we plug that hole with a plug we call test port plug.
Speaker one: Okay. Let’s see, how do you recommend testing or inspecting fixed orifice steam traps? [crosstalk 00:27:49].
Kelly Paffel: I recommend not using orifice steam traps, then you don’t have to worry about testing them.
Speaker one: Okay.
Kelly Paffel: You can’t test an orifice steam trap, they’re always blowing through.
Speaker one: Okay. Note to that person. Okay, and then this other person, if valves and steam traps are surrounded by insulation, how do you test them with ultrasound?
Kelly Paffel: Again, if insulation is a factor, so if it’s permanent insulation, it’s making a test port where the stethoscope module will go through and make contact with the pipe, and then once the test is done plugging that port, which gives you access from that day forward, is going up and looking for the plug in the insulation, removing it, and then the probe can go in which is done all the time.
Speaker one: All right, and last one at least for now, unless something comes in while you’re answering this, can check valves be tested?
Kelly Paffel: Well, that’s easy. Yes, check valves can be tested, for sure. In steam systems, a high failure rate in the steam system is people that use swing check valves, which should not be used in the steam system. Any check valve used should be a disc-type check valve.
Speaker one: All right, well those were the questions that came in, so if people have additional questions, or want any more information, we can get you Kelly’s contact information, just shoot me an email and we can get you guys in touch, so as you’re kind of digesting this through the day, if there’s something that pops up just toss us a note and we’ll get that over to him. Kelly, thank you so much. I just have a couple closing slides here before we let you all go. Of course you can go if you want, but just wanted to mention a couple things that aren’t necessarily related to steam, but we do have our newest publication, our lubrication e-book, so if steam isn’t the only thing you’re interested in, we do have that we just posted about a month ago on our website, so take a look at that, and our other new product is our compressed air survey online course, which we’ve had quite a few folks go through it, and I think people are finding it to be pretty valuable.
If compressed air is also something you’re looking at, look at that as something you can kind of take at your desk when it’s convenient, and where it’s convenient. Then, just wanted to show you our leak survey app that we have, it’s available now both in … I know I need to update this, but in the app store for iOS, and now for android, so it’s available in the google play store as well. This is a great tool where you can do a leak survey right from your phone or your tablet. We’ve had several customers using it, and they’ve just been raving about it as a quick and easy tool to get the survey done, and they generate their report, and email it to themselves right there from their device. Pretty cool, check that out, if again, if you’re doing compressed air leak surveys.
Then again, our website, lots of information on there. Not just on steam, but all the other applications as well, but certainly if steam is something that you’re still trying to learn some more about, we’ve got lots and lots of information up there for you to check out. Our LinkedIn groups, a great place to ask some questions there, and get some feedback from your peers that are experiencing similar things, so check out our ultra-probe users’ group, and our reliable asset world group on LinkedIn, and kind of get connected with those that are doing the same thing as you all around the globe. And then finally, save the dates, we’ve got our ultrasound world and reliable world conferences coming up next May 9th through the 12th in beautiful Clearwater Beach Florida, so it’s never too early to get those dates on your calendar, and we hope to see you down there.
With that, I’ll leave our contact info up, another thank you to Kelly for the great information, I’ll have the recording of this up on our website in the on-demand education portion of this site later today, so you can check that out, and we hope you’ll join us for the webinars we’ve got coming up in the next two weeks. With that, we’ll let you guys have a great rest of the day, and we’ll hopefully see you.